
Drawing Trees Tutorial 2 — part 1
by Vincent D Whitehead ©2008Leaf Work - Tree Foliage
I have come to the part of the drawing that is considered by some to be the most difficult when drawing trees. The leaf work can be broken down into steps just as the tree trunk itself. You will need to look at the leaf clumps and observe how the light reflects on them and then note the individual leaves as to how each one interacts with the other.
In most cases, you will not see each leaf completely. You will see extensions of each with overlapping views, and perhaps only a few leaves completely. That makes our work easier. Remembering our light source again and how it is reflected on the leaf clumps and the individual leaves, we must next observe how gravity and wind is affecting the leaves in our reference photo. Again, many factors determine how our subject looks. As branches grow out away from the tree trunk they get smaller. This sounds very basic but, it is important to how we do our work. As the branch gets smaller the weight of the leaves are affected by gravity and other forces such as wind or humidity or precipitation. They show that stress by bowing down toward the ground. Still others may be slightly lifted up by the wind. This "attention to detail" will make the difference between an OK drawing and a realistic drawing.
In the drawing below, the small branches and limbs are growing out of the tree trunk from the sides that are away from us, or just to our right or left. None are growing out of the viewer's immediate view or in front of the tree trunk. This means there will be a full view of the trunk all the way up the page in this drawing. It also means that there will not be any leaves or branches drawn in front of the trunk.
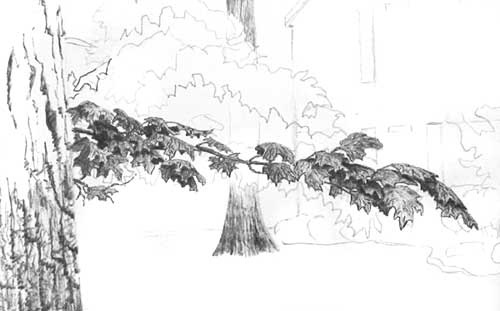
The image above is how the finished branch and leaf clump looks. Now I will explain how I got it.
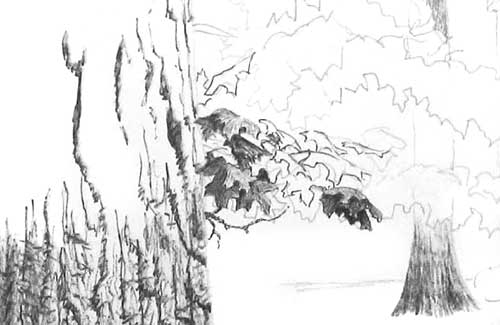
NOTE: I will usually draw through an entire leaf clump or branch section before I go back to add tone or detail. But, for this tutorial I have stopped and added these in the middle of the branch section, to show you how the individual leaves will work together to make the image look complete.
The Basic Technique
Take your Fine point pen, insure it has good ink flow and clean the ball tip. I started with the leaf that is closest to the tree trunk and farthest away from the viewer. Not much of the leaf is seen. Very lightly draw just the bottom portion of the leaf edge outline. Move to the next leaf closest to the viewer. Very lightly draw this leaf edge. Pay close attention to the way the edge of the leaf looks. Do this for all the leaves that are in the section that you are working on. Refer back to the reference photo often as you go.NOTE: I will usually draw through an entire leaf clump or branch section before I go back to add tone or detail. But, for this tutorial I have stopped and added these in the middle of the branch section, to show you how the individual leaves will work together to make the image look complete.
When the viewer looks at your work in its completed state, the eye picks up key indications that the brain has learned over time to tell it what the person is looking at. Those keys trigger memories that say, "That's a tree" or "those are leaves". If you, as the artist, can trigger enough of those keys then your work will be seen as realistic or believable. In a sense, we are fooling the brain. What does all this mean to you and me? It means that as long as you can draw a bit of a leaf many times and put them in a position that looks natural then you can draw a believable or realistic tree. You still have to practice and you still must develop your eye as an artist to be able to render what you see. But, it makes the task that much easier. At least it does from my humble point of view.
Once you have worked through the leaf clump or branch section, stop and assess where you are at with it. If it looks like what you want or as it is in the reference photo, then you are done with the outline work. If not, add what you need.